I come up with inspiration in the weirdest places. Don't ask me why I was thinking about this week's Just Us Girls Template Challenge in church. I know I should have been listening to the sermon, but for some reason Kelleigh Ratzlaff Designs Canister Box Template came to mind and how it would make a great jack-o-lantern.
Supplies:
Kelleigh Ratzlaff Designs Canister Box Template
Lindsay's Stamp Stuff Spooky Pumpkins stamp
J & Company Papers and orange, black & green cardstock
orange, yellow, black and green Copic markers
Pumpkin Font from DailyFreeFonts.com
This project made me realize how much I need to consider purchasing a Cricut and Sure Cuts a Lot or a Silhouette. I have to do all my cutting by hand and having a machine would make it go so much more faster. Anyone have any suggestions about either machine?
Thursday, September 30, 2010
Sunday, September 26, 2010
Candy Corn Cones
When I received this month's issue of Woman's Day with the wreath made of candy corn on the cover, I came up with the idea for a candy corn cone. Since then I see others have had similar inspiration and have posted great ideas with decorating with Halloween candy. One thing great about these projects is that you probably have the basic supplies and the rest can be bought in the dollar store.
The cones I used were slightly larger than 8 rows of candy corn, but not tall enough for 9 rows so I cut off a little on the top. To finish off the cones, I glued 1 candy corn in the center and made another row to wrap around it.
Because I wanted different heights and chose to use standard dollar store cones, I found these rocking candle holders at Savers. I love walking into Savers and finding exactly what I want and paying exactly what I want to.
This project is just the first of my Halloween projects that I'm slowly finishing up. Hopefully this week I'll have 2 or 3 more posted. One is having technical difficulties that I hope to resolve tomorrow.
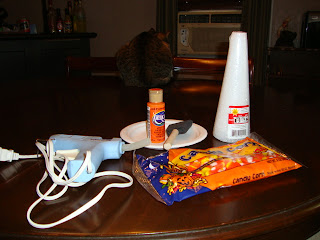
Supplies:
2 Styrofoam cones
2 bags of candy corn
orange paint, sponge brush, glue gun and glue
I started by painting the cones orange. The cone needs a good coat of paint because the cone will show through the candy corn. The Diet Dr. Pepper is not necessary, but it's good to stay hydrated.
Squeeze a thick line of hot glue onto the cone. You want to squeeze just enough that you can work with before it dries. Then place the candy corns flat against the cone making rings around the cone.
Not all rows will work out even and there will be gaps that are too big to leave empty, so I stuck a candy corn on it's side when I encountered this.
Because I wanted different heights and chose to use standard dollar store cones, I found these rocking candle holders at Savers. I love walking into Savers and finding exactly what I want and paying exactly what I want to.
This project is just the first of my Halloween projects that I'm slowly finishing up. Hopefully this week I'll have 2 or 3 more posted. One is having technical difficulties that I hope to resolve tomorrow.
Thursday, September 23, 2010
JUGS 51 - Color Challenge
Honestly I thought my first real crafting post was going to be about one of the Halloween crafts I am currently working. Unfortunately, none are ready at the moment and the Just Us Girls #51 - Color Challenge closes tonight and is taking precedence. Just Us Girls is a weekly card making challenge that I have participated in the past. This week's challenge is to use the colors red, green and black in your card. Here is my entry.
Supplies used:
Petal and Leaf Templates from Mainly Flowers
Merry Christmas stamp from Warm Holiday Wishes by Inkadinkado
Red, White & Black Card Stock
Printed Paper was from scraps
Tag, Black Ribbon, Red Seed Beads, Black & Red ink pad, sponge dabber, red Copic marker, glue dots, Elmer's Craft Glue and embossing pen.
To make the poinsettia, I used the used the poinsettia template from the Petal and Leaf Template to print out 12 leaves on red cardstock. I cut out the leaves, embossed the back with my embossing pen and sponged on red ink. Then I glued down the first layer of 6 leaves down on a scrap of paper. The next layer a curled each leaf before I glued it down with glue dots. Then I made a circle with the Elmer's glue in the center of the flower and carefully poured the seed beads on the glue.
Saturday, September 18, 2010
Welcome
Hi there. I'll keep the obligatory intro post short and sweet. I’m at a crossroads in my blogging. I run castingon.net, but I find that I’m not knitting as much as I used to and that I’m doing more other type of crafting. That’s why I started Craftsical. I came up with the name one morning while drinking coffee and listening to a sneak preview of the music from the second season of Glee. A little strange, but fun. What if our crafts could break out into musical numbers?
Thanks for stopping by and happy crafting!
What will you find here? No craft is off limits. If I make it, I may post it. Right now I’m very big on papercrafting, but Halloween is coming up and I have a few ideas I’d like to share. Speaking of sharing, I find a lot of great ideas on the internet that I’d like to share. I found that Tumblr is a super simple way of doing that. Feel free to follow my Tumblr feed at craftsical.tumblr.com and my RSS feed here.
So please bear with me and my growing pains. And a quick thanks to Cutest Blog on the Block and the designer Summertime Designs for this great background and header.
Subscribe to:
Posts (Atom)